Wingback.js pricing module dynamically renders pricing pages to let new customers choose the plan to buy and sign up with your services.

1. Creating a Pricing Page

Before displaying a pricing page you have to create it from the pricing pages option of Wingback’s app portal.

To create a pricing page you’ll have to enter a name, a slug and select at least one plan.

In the pricing pages editor you will be able to select the plans to offer, edit the name of the pricing page, specify a custom callback url, and set more options that will determine how the pricing page will be displayed.

The pricing page slug si composed of your wb_customer slug and the pricing page slug, separated by a forward slash, e.g. 
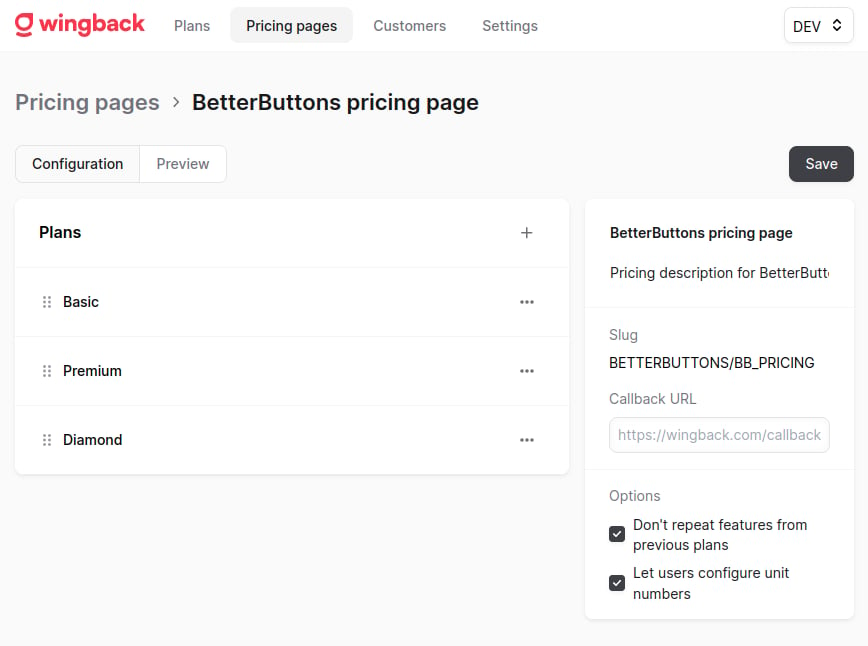
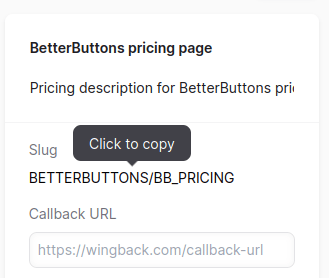
MY_COMPANY/BASIC_PRICING. It uniquely identifies the pricing page, and you will need it to tell the pricing module which pricing page to display.

If you don’t remember it you can go to the pricing editor and click on the slug to copy it:

The Callback url is where the customer will be redirected after he chooses to buy a plan. If not specified, customer will be redirected to Wingback’s signup page.

2. Adding a dynamic Pricing Page to your website

To integrate the pricing page into your own website you need to include the Wingback.js library and call the Wingback.pricing.render function, passing as parameter either a CSS selector (e.g. #pricing) or a DOM element where the pricing page should be rendered, and the pricing page slug.

A minimal example would look like this:

index.html
<!DOCTYPE html>
<html lang="en">
  <head>
    <script src="https://js.wingback.com/v1/wingback.js"></script>
  </head>

  <body>
    <div id="pricing"></div>
    <script>
      Wingback.pricing.render('#pricing', 'BETTERBUTTONS/BB_PRICING');
    </script>
  </body>
</html>

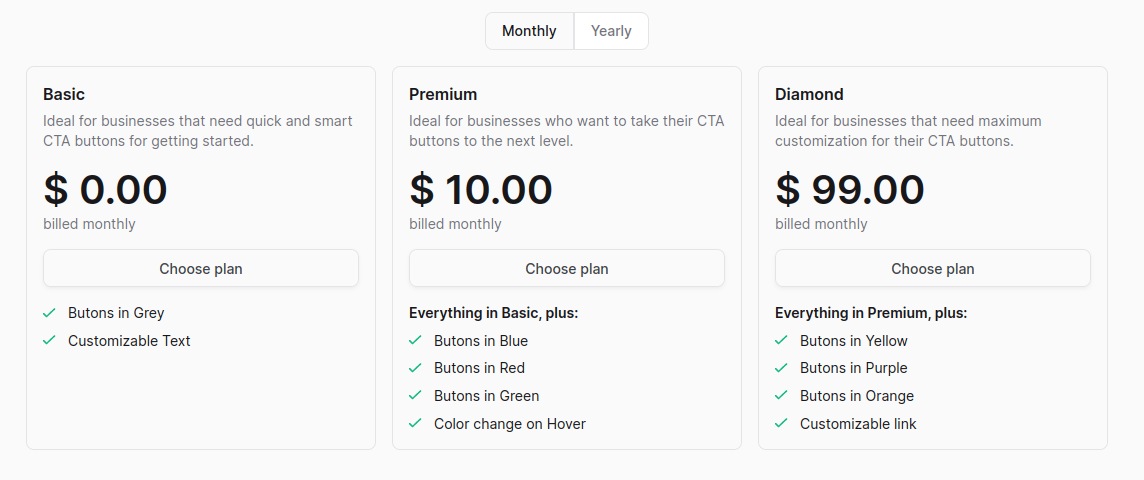
You can also display a pricing page without any integration task on your part by just navigating to https://billing.wingback.com/pricing/[wb_customer_slug]/[pricing_page_slug]

For example, if you navigate to https://billing.demo.wingback.com/pricing/BETTERBUTTONS/BB_PRICING you’ll see the following:

Take into account that this it not just a preview, it’s a valid and live pricing page. You can share it with any potential customer and he’ll be able to chose the plan, enter the units he wants to buy, his payment method and billing information, and he’ll sign up to your services.

If you need a quick way to let someone buy your services, this is an easy and valid alternative.

4. Signing up a New Customer

After the customer clicks on the “Choose plan” button he’ll be redirected to the signup form. There he’ll be able to select the units to buy, enter the payment method and billing information, and buy the plan.

You can specify a different callback in the pricing page editor to redirect the user to your own signup page.

After the customer completes the information and clicks the 
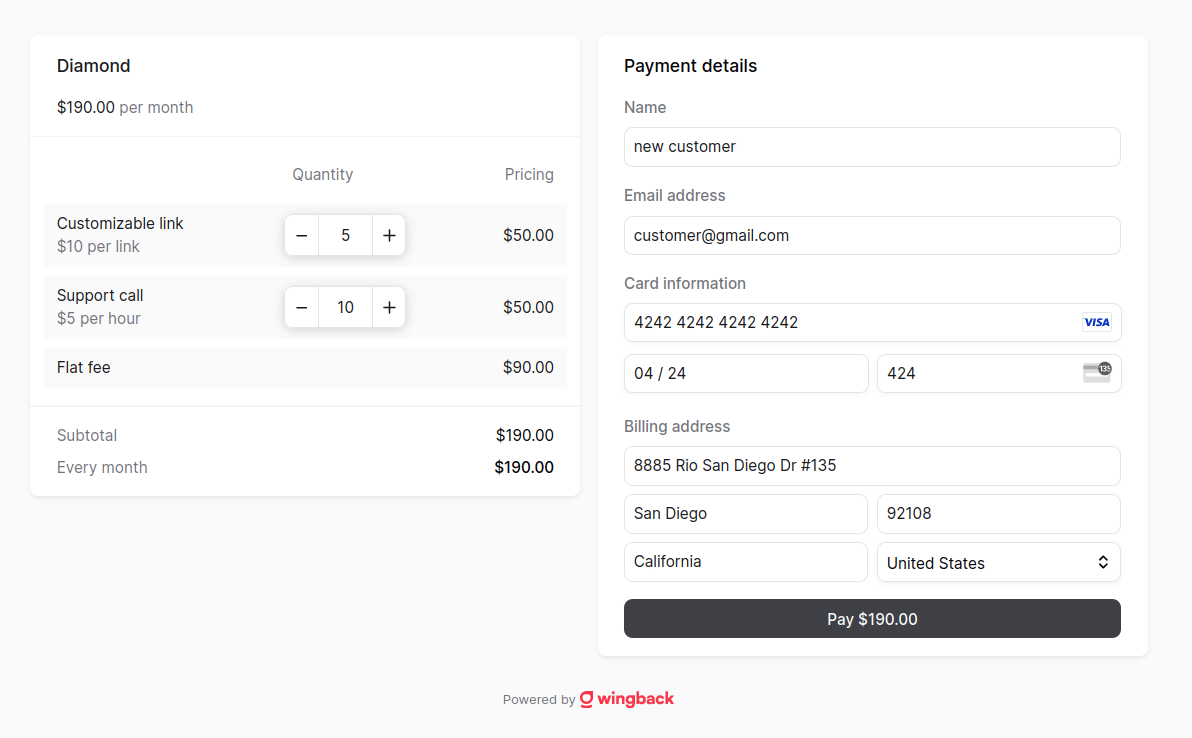
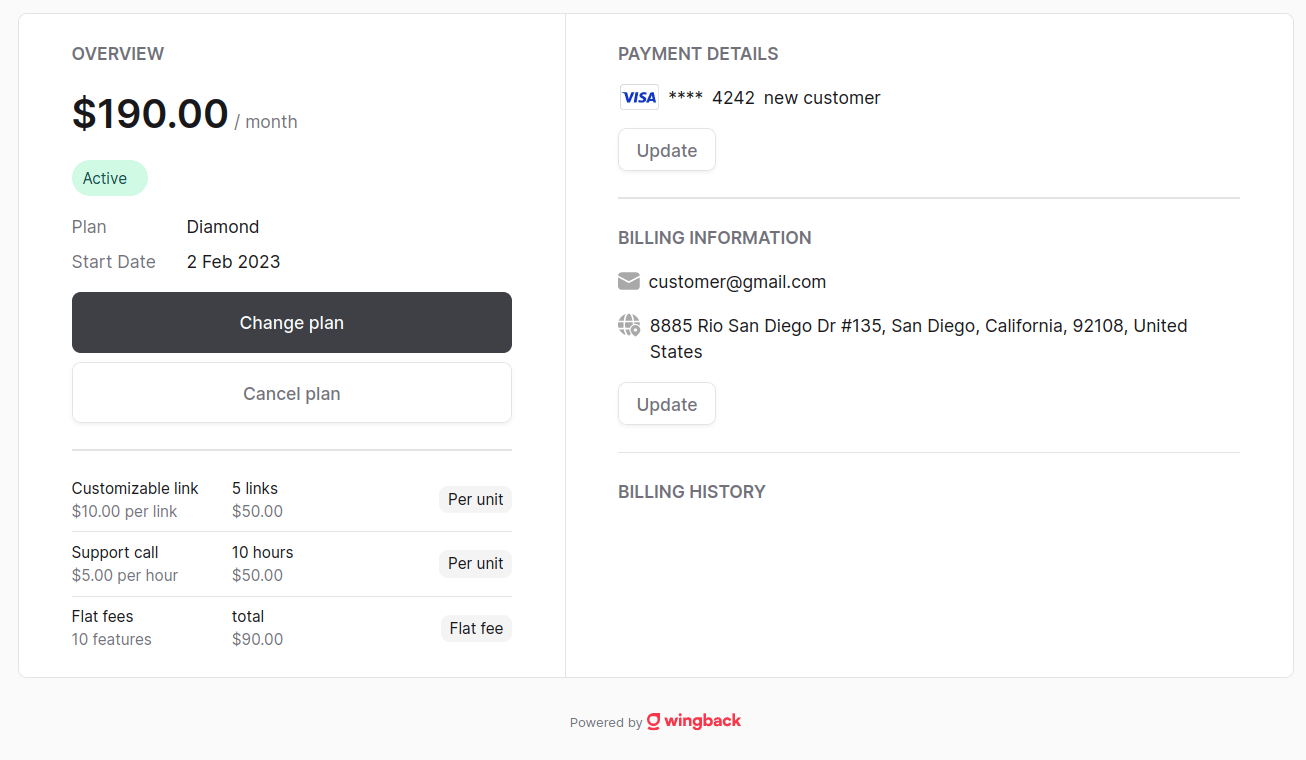
Buy button, he’ll be redirected to the Billing Portal, where he’ll be able to manage his contract.

5. Wingback.pricing.render parameters

The Wingback.pricing.render method accepts the following parameters:

el
HTMLElement | string
required

The dom element or the id of the container where the pricing table will be rendered.

slug
string
required

The slug of the pricing table you created in the Wingback application (e.g. ‘COMPANY_SLUG/PRICING_SLUG’).

options
object

A set of options to customize the rendering of the pricing page.

6. Customizing the Pricing Page appearance

The generated pricing page provides the following style classes structure to let you customize the appearance of the pricing page using css selectors:

<!-- container for the whole pricing -->
<div class="wb-pricing">

  <!-- toolbar to filter by billing cycle -->
  <div class="wb-select-cycles">
    <button class="wb-select-cycle selected">Monthly</button>
    <button class="wb-select-cycle">Yearly</button>
  </div>
  
  <!-- container for the list of plans -->
  <div class="wb-plans">

    <!-- 
      container for each plan with dynamic 
      wb-plan-slug-[plan slug] wb-plan-name-[sluggified_plan_name] classes 
    -->
    <div class="wb-plan wb-plan-slug-PP7043079601671656 wb-plan-name-basic">

      <!-- section for title and description of the plan -->
      <div class="wb-title-section">
        <div class="wb-title">Basic</div>
        <div class="wb-description">
          Ideal for businesses that need a simple solution to get started.
        </div>
      </div>

      <!-- section for price and billing cycle of the plan -->
      <div class="wb-price-section">
        <span class="wb-price">
          <span class="wb-price-currency-symbol">$</span> 
          <span class="wb-price-amount">20.00</span>
        </span>
        <span class="wb-billed"> billed monthly</span>
      </div>

      <!-- 
        input control to enter the quantity of 
        units to buy for a per unit priced plan 
      -->
      <div class="wb-plan-per-unit-section">
        <div class="wb-plan-per-unit-input">
          <!-- input control to enter the quantity of units to buy -->
        </div>
        <div class="wb-plan-per-unit-input-summary">
          <span class="wb-plan-per-unit-price">$100.00 per user</span>
          <span class="wb-plan-per-unit-flat-fee">$10.00 flat fee</span>
        </div>
      </div>

      <!-- section with the CTA ('Choose plan') button -->
      <div class="wb-buy-section">
        <a 
          class="wb-buy-button" 
          href="https://company.com/custom-signup-callback/PP7043079601671656"
        >
          Choose plan
        </a>
      </div>

      <!-- section for unit priced features, on a per feature priced plan -->
      <div class="wb-features-per-unit-section">

        <!-- 
          input control to enter the quantity of 
          units to buy for each per unit feature 
        -->
        <div class="wb-feature-per-unit">
          <span class="wb-feature-per-unit-name">Supported users</span>
          <div class="wb-feature-per-unit-input-container">
            <!-- input control to enter the quantity of units to buy -->
            <div class="wb-feature-per-unit-summary">
            <span class="wb-feature-per-unit-unit-name">User</span>
              <span class="wb-feature-per-unit-price">$100.00 each</span>
            </div>
          </div>
        </div>

        <!-- rest of the unit priced features... -->
      </div>

      <!-- section for the rest of the feature (not unit priced features) -->
      <div class="wb-features-section">

        <ol class="wb-features">
          <!-- 
            container for each feature with dynamic 
            wb-feature-slug-[feature slug] class 
          -->
          <li class="wb-feature-container wb-feature-slug-SUPPORT-CALL">
            <span class="wb-feature">Support call</span>
          </li>

          <!-- rest of the features... -->
        </ol>
      </div>
    </div>

    <!-- rest of the plans of the pricing page... -->
  </div>
</div>

This detailed CSS selector structure gives you unprecedented level of control to completely customize each pricing page component to your needs, just by applying custom CSS rules targeting the specific element you want to customize.

Wingback.js pricing also generates specific class names for plans (using the plan slug and the plan name) and features (using the plan feature) to let you target a specific plan.

For example, given a plan named ‘Enterprise Cloud-Hosted Edition’ with a slug ‘PP123456789’ you would get the following clases:

<div class="wb-plan wb-plan-slug-PP123456789 wb-plan-name-enterprise_cloud_hosted_edition">
  <div class="wb-title-section">
    <div class="wb-title">Enterprise Cloud-Hosted Edition</div>
    <div class="wb-description">Ideal for teams with more security, support, and performance needs.</div>
  </div>
  <!-- rest of the plan elements... -->
</div>

Which will allow you to target that specific plan and the elements within it by slug or by name.

Accordingly, if you have a feature with the slug ‘SUPPORT_CALL’ you would get the following clases:

<ol class="wb-features">
  <li class="wb-feature-container wb-feature-slug-SUPPORT_CALL">
    <span class="wb-feature">Support call</span>
  </li>
  <!-- rest of the plan's features... -->
</ol>